
Code coverage with Python
Trying to use Codecov with your Python project? Start here.
To start you will need the following:
- A code host (we'll be using Github in our example here)
- A repository
- Tested code within that repository
- A Codecov account
For easy reference here is our Python Example repo that we will reference throughout the walk-through.
Getting test coverage using Pytest
In this tutorial, we’ll use pytest -cov to generate a code coverage report locally. Make sure to include pytest-cov in your requirements.txt or by running pip install pytest-cov.
We'll show how you can run pytest locally (in terminal) or in CI and have it output a coverage report. Later, we’ll utilize the power of Codecov along with GitHub Actions to integrate our coverage report into our pull requests.
Generating a Coverage Report and Viewing It Locally
Let's start with a pretty basic calculator app in Python. Following these steps should show you how to run tests and generate a coverage report locally. We'll upload this to Codecov in the next step.
class Calculator:
    def add(x, y):
        return x + y

    def subtract(x, y):
        return x - y

    def multiply(x, y):
        return x * y

    def divide(x, y):
        if y == 0:
            return 'Cannot divide by 0'
        return x * 1.0 / y
Pretend you're an awesome developer (actually, why pretend? You know you are.. ![]() ) and have written tests that you feel cover all the methods you previously defined.
) and have written tests that you feel cover all the methods you previously defined.
from .calculator import Calculator


def test_add():
    assert Calculator.add(1, 2) == 3.0
    assert Calculator.add(1.0, 2.0) == 3.0
    assert Calculator.add(0, 2.0) == 2.0
    assert Calculator.add(2.0, 0) == 2.0
    assert Calculator.add(-4, 2.0) == -2.0

def test_subtract():
    assert Calculator.subtract(1, 2) == -1.0
    assert Calculator.subtract(2, 1) == 1.0
    assert Calculator.subtract(1.0, 2.0) == -1.0
    assert Calculator.subtract(0, 2.0) == -2.0
    assert Calculator.subtract(2.0, 0.0) == 2.0
    assert Calculator.subtract(-4, 2.0) == -6.0

def test_multiply():
    assert Calculator.multiply(1, 2) == 2.0
    assert Calculator.multiply(1.0, 2.0) == 2.0
    assert Calculator.multiply(0, 2.0) == 0.0
    assert Calculator.multiply(2.0, 0.0) == 0.0
    assert Calculator.multiply(-4, 2.0) == -8.0

def test_divide():
    assert Calculator.divide(1, 2) == 0.5
    assert Calculator.divide(1.0, 2.0) == 0.5
    assert Calculator.divide(0, 2.0) == 0
    assert Calculator.divide(-4, 2.0) == -2.0
Now, run the command below in your terminal
pytest --cov api.calculator
We've structured our project to have an app and a backend api. We're running pytest to generate backend coverage. You can reference the example Github repo for more information.
This will run the tests and also generate a new file called .coverage. You can’t open this file directly in your code editor, but you can use it to generate a report in console that looks something like this.
Name                                Stmts   Miss  Cover
-------------------------------------------------------
api/calculator/__init__.py              0      0   100%
api/calculator/calculator.py           11      1    91%
api/calculator/test_calculator.py      25      0   100%
-------------------------------------------------------
TOTAL                                  36      1    97%
It looks like coverage is taking your test code into consideration when calculating the report. Don’t worry about that for right now. We’ll take care of that when we set up Codecov in the next step.
Note that we're missing tests on one line of code.
Pushing Your Project to Codecov
The real power of code coverage comes when you can integrate it into your team’s everyday workflow. This is where Codecov comes in, making this integration a breeze.
Sign up for Codecov
Visit https://about.codecov.io/sign-up/ and sign up for Codecov using your preferred auth mechanism.
For specific instructions on how to set up Codecov with GitHub, GitLab or BitBucket Pull Requests, you can reference our Team Bot Guide
Choose the repo you’d like to link with your Codecov account. You’ll be provided with a token. In some cases, you would need to use this token when uploading data from your repo to Codecov, but since you’re using a public repo here with GitHub Actions, you won’t need to provide the token. If you do decide to make your repo private in the future, you can always access this token again in the project’s settings section on the Codecov website.
Now that you’re set up on Codecov, it’s time to create a GitHub Action. This will be a three-step process every time you push a branch:
- Run your tests with coverage just like you did locally.
- Create the coverage report.
- Push that report up to Codecov so you can view your data and make it available as a graph in your pull request.
Although we're assuming GitHub Actions as our CI, you can do something similar on a CI of your choice
If you’ve never worked with GitHub Actions before, this tutorial is a great introduction. But to put it simply, you can control everything with a simple YAML config file. You can call the file whatever you want, but it needs to be in the .github/workflows directory, for example, .github/workflows/workflow.yml. Then, include the following code:
name: Workflow for Codecov example-python
on: [push, pull_request]
jobs:
  run:
    runs-on: ubuntu-latest
    steps:
      - name: Checkout
        uses: actions/checkout@v3
      - name: Set up Python 3.10
        uses: actions/setup-python@v4
        with:
          python-version: '3.10'
      - name: Install dependencies
        run: pip install -r requirements.txt
      - name: Run tests and collect coverage
        run: pytest --cov app
      - name: Upload coverage to Codecov
        uses: codecov/codecov-action@v3
The actions that matter to you are Run tests and collect coverage and Upload coverage to Codecov.
Generating the report looks just like it did when you generated it locally. Instead of running our tests with python, we run them with coverage.
Fortunately, Codecov has made the next part, uploading the data to Codecov for viewing, extremely easy with our codecov-action integration.
You can read more about the options it offers in the documentation, but for a basic upload, all you need to do is tell the action to use version 3(@3) of the codecov-action, and it will take care of the rest for you. Once this file is in place, you can push your branch up to GitHub.
PS - We have similar helpers for CircleCI and Bitrise as well ![]()
You’ll be able to see your actions running under the Actions tab on your GitHub repo.
Once they’ve finished successfully, you should see Codecov comment on your PR with a coverage report
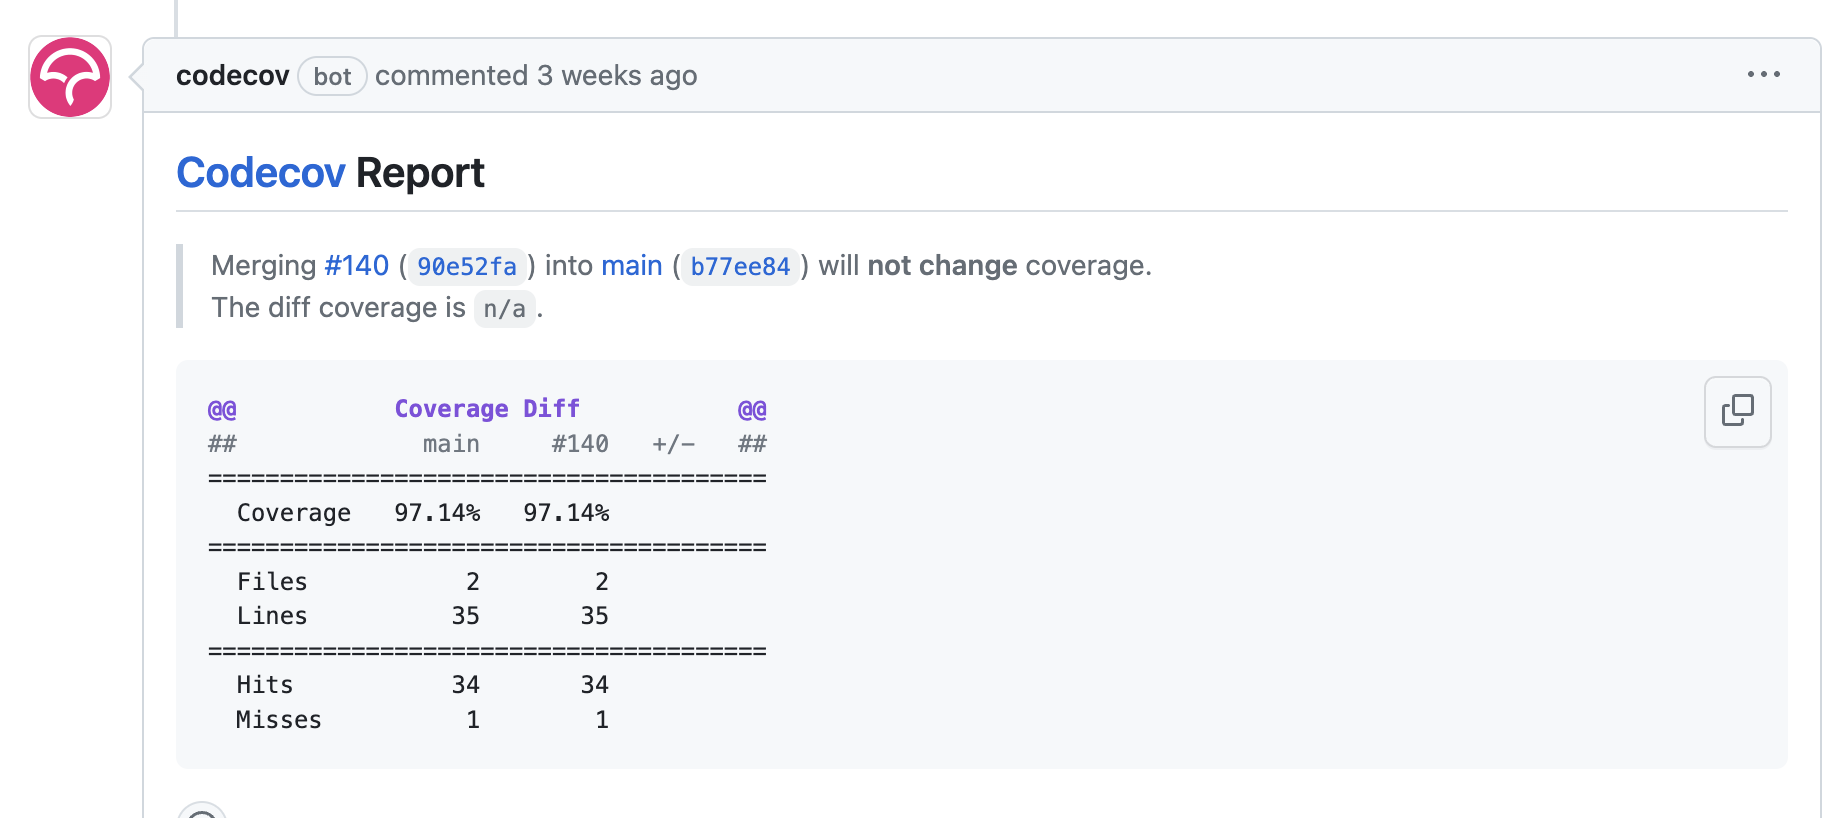
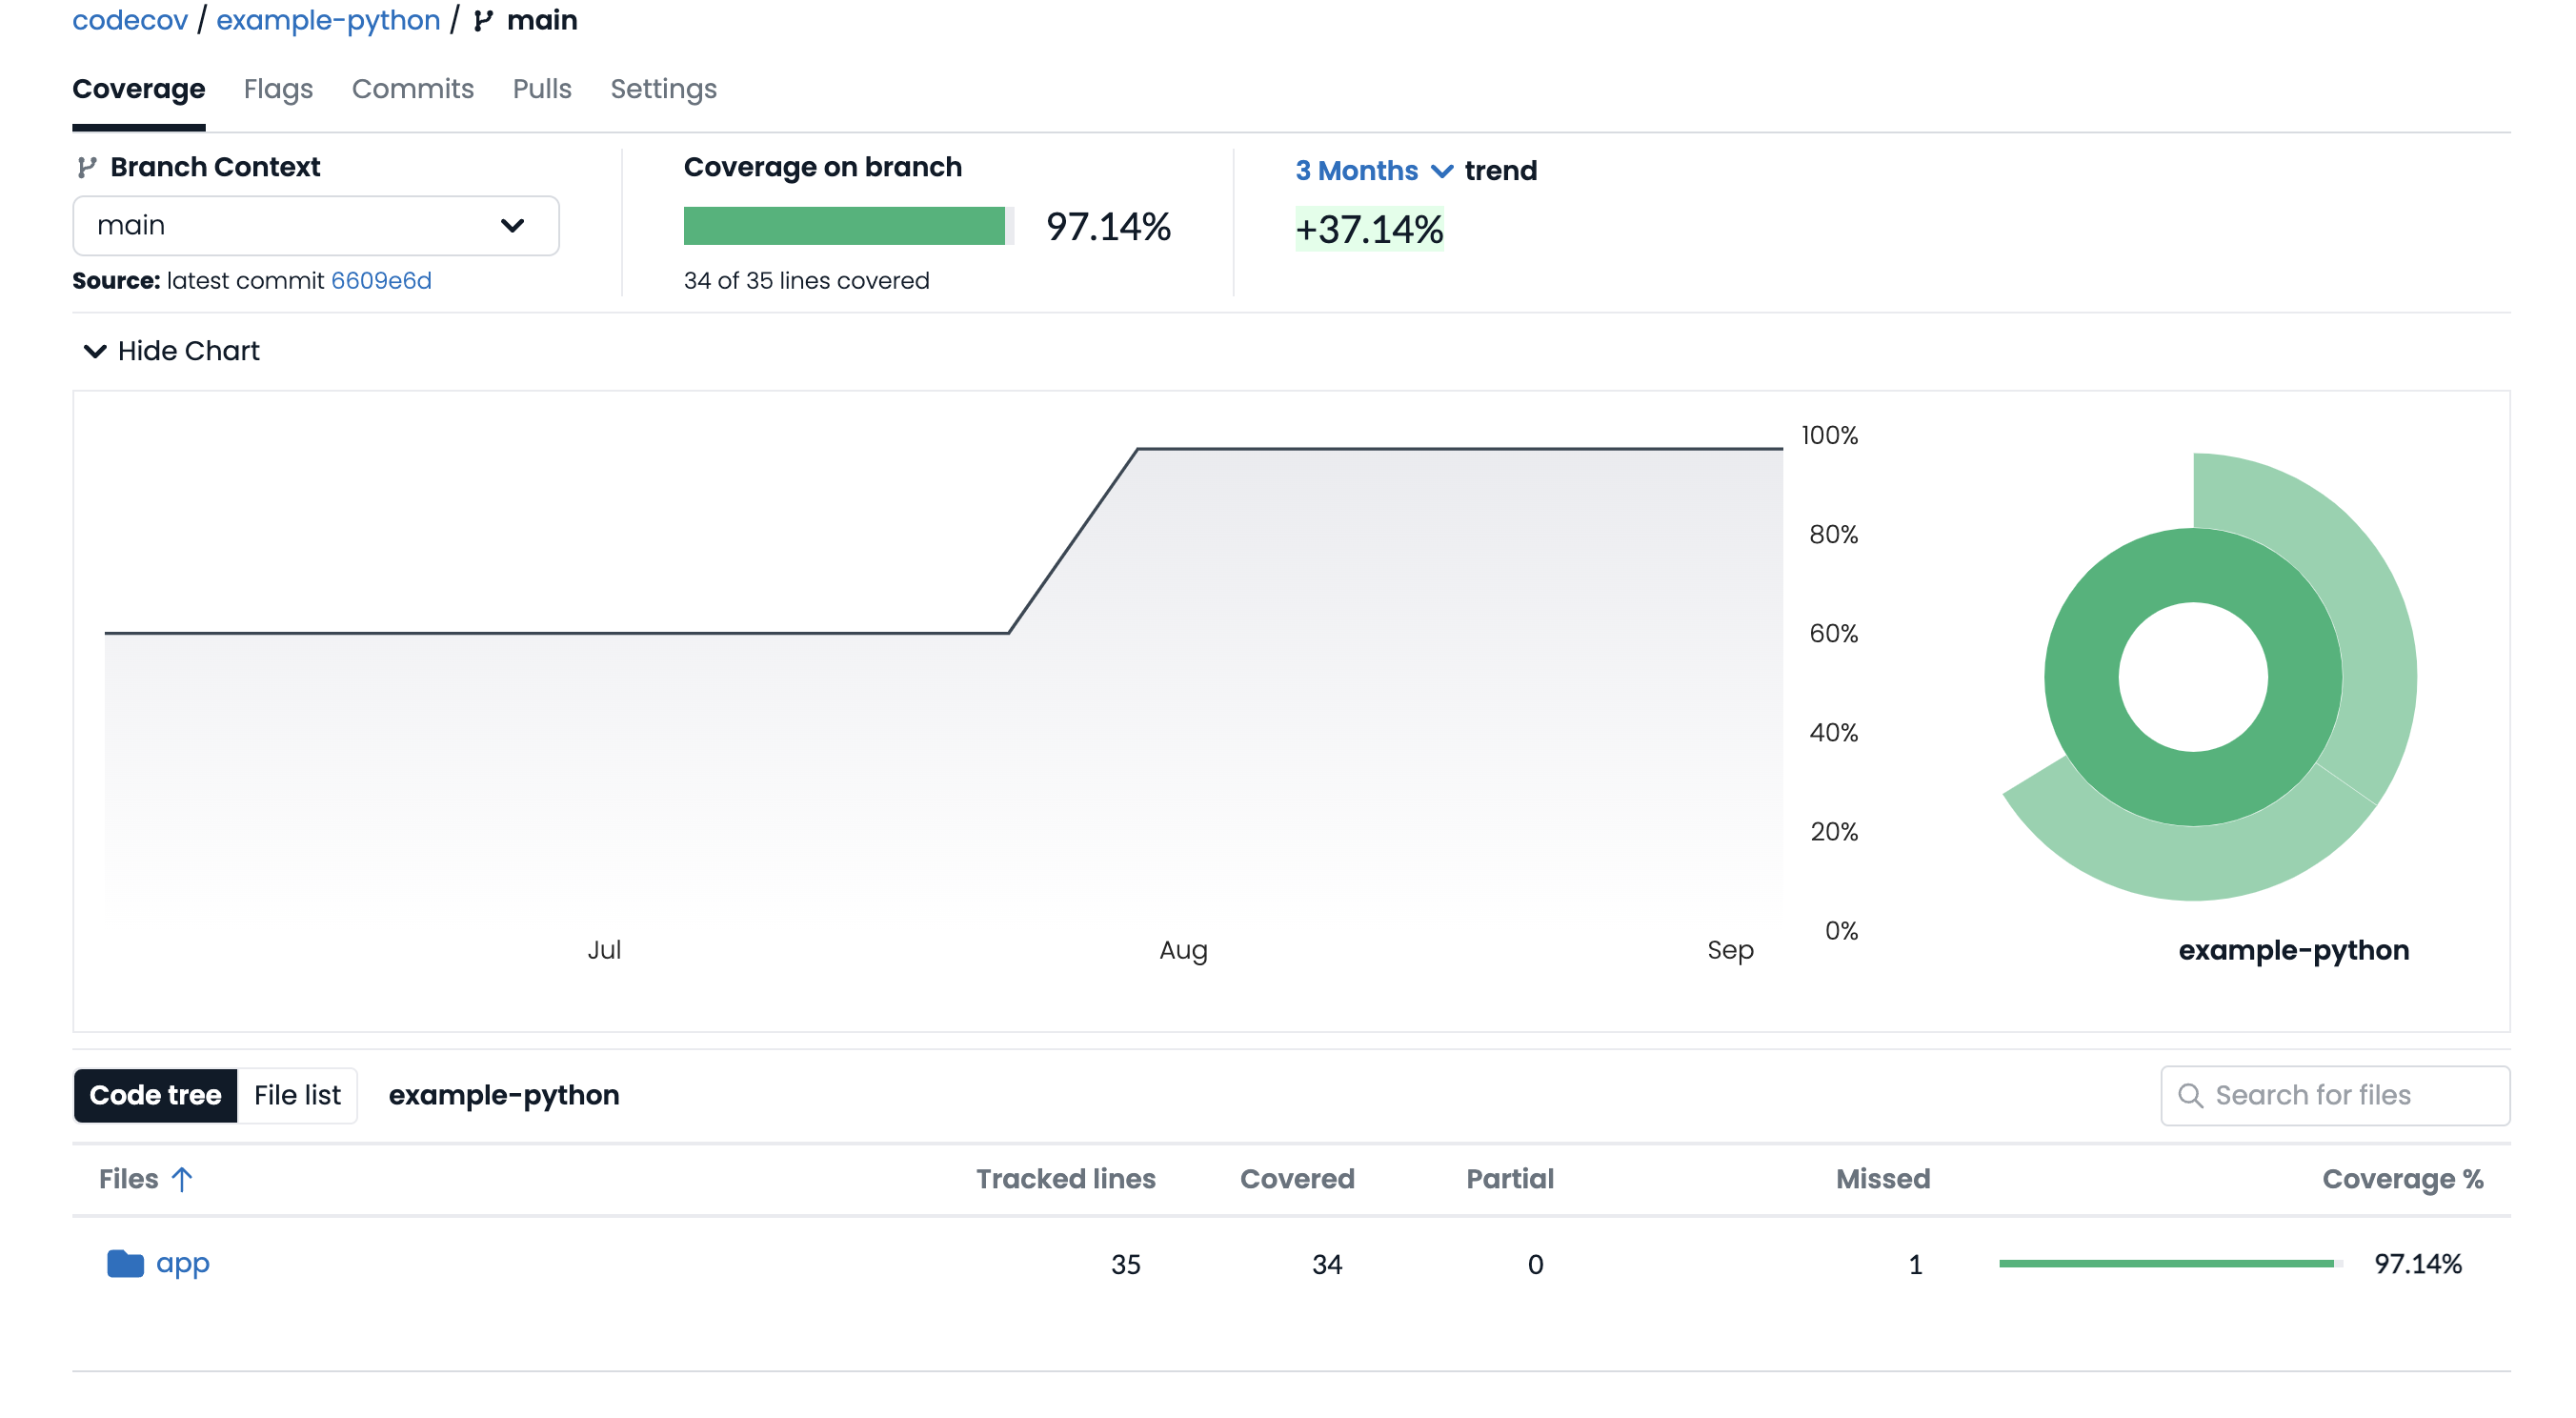
You can then follow the links in the PR comment to the Codecov app to see more information about your project's overall test coverage
You can customize Codecov well beyond what we can cover in this tutorial, but one thing that will be helpful here is to tell Codecov to ignore your test files when creating a report. You can do that with ignores in your codecov.yml like so
# sample regex patterns
ignore:
  - "path/to/folder"  # ignore folders and all its contents
  - "test_*.rb"       # wildcards accepted
  - "**/*.py"         # glob accepted
Advanced Codecov configurations
Now that you have uploaded your first Python coverage reports successfully to Codecov, you can check out some of our other features including
- Configuring Codecov settings
- Adding flags to isolate coverage reports
- Labeling critical files
Updated 11 days ago