
Getting Started with Automated Test Selection on your CI
Step-by-step guide to integrating Automated Test Selection in Github Actions
This guide will lead you through the necessary steps of integrating Automated Test Selection into your Python repo. By the end of the guide, you will have a workflow that runs Automated Test Selection in your CI. This guide assumes Github Actions as the CI of choice, but the usage patterns can be reasonably extended to any other CI provider that Codecov supports. Find a full list of supported CI providers here
Looking to quickly integrate with Github Actions?
If you're already using GitHub Actions, you can quickly save some time and get setup by adding the Codecov-ATS Github Action step to your workflow. Learn more here.
If you're using a different CI that we don't have an ATS helper for, you can keep reading.
Prerequisites
- A Python project that uses the pytest library to run tests
- This project needs to be using Codecov already. If it isn't you can setup codecov following this guide
Getting Started
This guide has 2 parts
Part 1 will integrate static analysis to your CI. Part 2 will integrate label analysis. You need to complete both in order for a successful Automated Test Selection integration.
 Just want to see the full workflow? Skip to Full Workflow
Part 1
Step 1. Get and authentication tokens
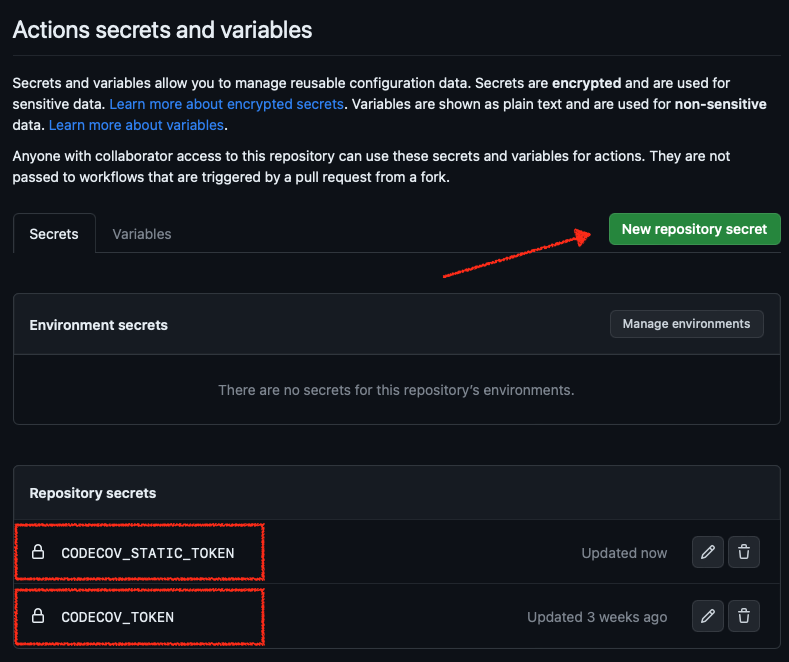
You will need both the Repository upload token (aka CODECOV_TOKEN) and Static analysis token (aka CODECOV_STATIC_TOKEN). You can get it on the Settings page of your repo.
Copy these codes for later. They will be used to authenticate actions with the Codecov CLI.

Go to the ⚙️ Settings tab in your GitHub repository. On the side panel find Secrets and variables > Actions.
There you should create 2 repository secrets:
- CODECOV_TOKEN, with the value of Repository upload token
- CODECOV_STATIC_TOKEN, with the value of Static analysis token
Step 2. Configure the codecov.yml for Automated Test Selection
To use Automated Test Selection you need a flag with the new Carryforward mode "labels". You can reuse any existing flag if you have one already. Read more about Carryforward Flags Here we are creating a "smart-tests" flag with carryforward_mode: "labels".
We're also adding some configuration for the CLI that will be used when uploading the coverage data to Codecov.
flag_management:
  individual_flags:
    - name: smart-tests
      carryforward: true
      carryforward_mode: "labels"
      statuses:
        - type: "project"
        - type: "patch"

cli:
  plugins:
    pycoverage:
      report_type: "json"
Step 3. Create the workflow file
Go into your local copy of your repository and create a new file .github/workflows/codecov-ats.yml.
We are also setting up Python and checking out the code. Notice the use of fetch-depth: 0. This option includes your git history in the workflow, that will be used with the label-analysis step later on.
You can copy the following snippet :
name: Codecov-ATS

on:
  push

jobs:
  codecov-ats:
    runs-on: ubuntu-latest
    steps:
      - uses: actions/setup-python@v3
      - uses: actions/checkout@v3
        with:
          fetch-depth: 0
      - name: Install Codecov CLI
        run: |
          python -m pip install --upgrade pip
          pip install codecov-cli
      - name: Create commit in codecov
        run: |
          codecovcli create-commit -t ${{ secrets.CODECOV_TOKEN }}
      - name: Create commit report in codecov
        run: |
          codecovcli create-report -t ${{ secrets.CODECOV_TOKEN }}
      - name: Static Analysis
        run: |
          codecovcli static-analysis --token ${{ secrets.CODECOV_STATIC_TOKEN }}
Note -
- There are other options to download the Codecov CLI
- We create 2 commits to give Codecov a head start on fetching data from GitHub and creating some internal structures used during coverage processing.
- The first
static analysisrun can take a while as we're uploading a lot of information. Subsequent runs are faster. - The example command below will analyze all files in your project. There are options to speed up static-analysis by restricting the files that will be analyzed. For example if you have a mono repo with many different apps and will only uses Automated Test Selection in one app you can analyze only the files for that app and its tests. Read more about how to do that Static Analysis.
Step 4. Stop and create a new commit (Optional)
We recommend to stop here and create a PR with your changes so far, to let the CI run for the current commit. Then branch off of it and follow the next steps. If you choose not to do this, just know that the first run of Automated Test Selection will fail the label-analysis step, but subsequent runs should work correctly.
Part 2
Depends on Part 1
You should only follow the steps below if you successfully completed the Part 1 of the guide.
Step 5. Run label analysis and upload to Codecov
Now that you are (hopefully) in a fresh commit, let's resume our changes to .github/workflows/codecov-ats.yml.
Now we'll set up our test environment, run label analysis (which is where Codecov determines what tests need to run) and uploads the results to Codecov
	...
  # previous step. Upload static analysis information
  # current step. Install dependencies, build,run Label Analysis,  upload Coverage to Codecov
  # Part 2
      - name: Install dependencies
        run: |
          pip install -r requirements.txt
      - name: Label Analysis
        run: |
          BASE_SHA=$(git rev-parse HEAD^)
          codecovcli label-analysis --token ${{ secrets.CODECOV_STATIC_TOKEN }} --base-sha=$BASE_SHA
      - name: Upload to Codecov
        run: |
          codecovcli --codecov-yml-path=codecov.yml do-upload \
          -t ${{ secrets.CODECOV_TOKEN }} \
          --plugin pycoverage \
          --plugin compress-pycoverage \
          --flag smart-tests
Note -
- When running Label Analysis - note we're setting our
BASE_SHAto compare against current commit. If you've followed the guide then the other commit with static analysis should be the parent of your commit (HEAD^). To get a reference to it we can usegit rev-parse HEAD^.- After you have many commits with static analysis info it might be more interesting to use
git merge-base HEAD^ origin/masteras the base commit. This ensures the diff covers the entire feature-branch's changes compared to master.
- After you have many commits with static analysis info it might be more interesting to use
- The example shows how to run tests using the Codecov CLI as a test runner. However, if you have a defined test architecture already, we strongly recommmend using the
dry runoption in the CLI to output a list of tests. Here's how.- If you do end up using this option, we recommend you do not remove any existing test parallelization while setting up Automated Test Selection. If you remove parallel test running, then some test runs may take significantly longer if Automated Test Selection chooses to run all tests (which can happen depending on the code change)
- Test information needs to be generated with test context information, using the label we used in our
codecov.yml(We called itsmart-tests) - Currently only
jsoncoverage reports are supported for Automated Test Selection. The easiest way to do that is to use thepycoverageplugin on the CLI. Thecompress-pycoverageplugin is optional but recommended, as it can greatly reduce the size of the report that will be uploaded to Codecov.
Full example workflow
If you followed the guide up until this point, our .github/workflows/codecov-ats.yml should be looking like this:
name: Codecov-ATS

on:
  push

jobs:
  codecov-ats:
    runs-on: ubuntu-latest
    steps:
      - uses: actions/setup-python@v3
      # Part 1
      - uses: actions/checkout@v3
        with:
          fetch-depth: 0
      - name: Install Codecov CLI
        run: |
          python -m pip install --upgrade pip
          pip install codecov-cli
      - name: Create commit in codecov
        run: |
          codecovcli create-commit -t ${{ secrets.CODECOV_TOKEN }}
      - name: Create commit report in codecov
        run: |
          codecovcli create-report -t ${{ secrets.CODECOV_TOKEN }}
      - name: Static Analysis
        run: |
          codecovcli static-analysis --token ${{ secrets.CODECOV_STATIC_TOKEN }}
      # Part 2
      - name: Install dependencies
        run: |
          pip install -r requirements.txt
      - name: Label Analysis
        run: |
          BASE_SHA=$(git rev-parse HEAD^)
          codecovcli label-analysis --token ${{ secrets.CODECOV_STATIC_TOKEN }} --base-sha=$BASE_SHA
      - name: Upload to Codecov
        run: |
          codecovcli --codecov-yml-path=codecov.yml do-upload \
          -t ${{ secrets.CODECOV_TOKEN }} \
          --plugin pycoverage \
          --plugin compress-pycoverage \
          --flag smart-tests
Wait... how do I know if it's working?
To check that it's really working, you’ll need to see in the logs of the CLI. Look for the summary of informations about tests to run. On the first run with label analysis expect to see that line have only absent_labels information. This is because Codecov has no coverage info for any tests in your test suite yet.
info - 2023-05-02 17:11:55,620 -- Received information about tests to run --- {"absent_labels": 47, "present_diff_labels": 0, "global_level_labels": 0, "present_report_labels": 0}
Over time, we expect to see more labels in the present_report_labels, so that only new tests are in absent_labels, and tests that are affected by your recent changes are in present_diff_labels. Something similar to the example below.
info - 2023-05-02 17:11:55,620 -- Received information about tests to run --- {"absent_labels": 3, "present_diff_labels": 5, "global_level_labels": 0, "present_report_labels": 47}
FAQ
- Do I really need to use
fetch-depth:0when checking out the code?
Not really, as long as you know the BASE_SHA you can checkout just the current commit. If you always use the parent (HEAD^) commit you can use a fetch-depth of 2, for example. However when doing git merge-base HEAD^ origin/master, you will need a depth of 0.
- Why
on: pushand noton: pull_request?
You can run Automated Test Selection only on pull requests if you prefer. However, we need static analysis information for all commits. In particular if you were to merge the PR with the workflow into main with it set to only run in pull requests we would not have that information for the merged commit, and the part II (steps 9 - 11) would fail.
Also it's perfectly fine to run this in your main branch.
Further Reading
- Overview of Automated Test Selection - Automated Test Selection
- Troubleshooting Automated Test Selection integration - 🔥Troubleshooting
- Overview of the Codecov CLI - The Codecov CLI
- Details on Static Analysis - Static Analysis
- Details on Label Analysis - Label Analysis
Updated 6 months ago